Continuous Looper
8-track live-looper and performance sampler


This is an April update on Augmented Audio Libraries, my hobby libraries for audio programming in Rust (check previous updates).
It is a special one because today I have released an initial version of
Continuous Looper on the macOS App Store (iOS version coming soon next).
There’s a lot to do and fix, but I think publishing this post (and the app) to get some feedback will help me.
You can download the app now here
In this post, I’ll discuss how I have written this app, the approaches I have been trying and challenges faced.

Continuous Looper
Continuous Looper is a fully open-source 8-track live-looper and performance sampler, written in Rust/Swift which features:
- 8-track looping/sequencing
- Step sequencing live after recording
- 2 quantization modes
- Scenes and parameter locks
- Click and twist MIDI mapping to any parameter & the record-button
- 2 LFOs + 1 ADSR envelope per track
- Automatic slicing based on transient detection
- Basic pitch shifting (potentially dated phase-vocoder)
- Variable start/end/speed
Since the scope got large, there are many rough edges! But it has worked well.
The app/GUI source-code is available under the AGPLv3 license at augmented-audio/crates/apps/looper/Sequencer and the engine source-code is available under the MIT license at augmented-audio.
Continuous Looper is inspired by the great Drambo iOS modular synth and by Octatrack.
Demo video
Here is a tiny demo video.
(Note: this is an iPhone video and audio is very low)
Table of contents
Some requirements for the app
It’s good to mention a couple of requirements that guide the decisions I have been taking and greatly increase complexity.
Real-time audio
The app must render audio in real-time. At fixed rate intervals, our software’s audio callback will be called with a buffer of numbers representing an audio signal. Our software will have a capped amount of time (roughly between 1ms-10ms) to finish. It must finish in this time or else playback will audibly glitch.
The code that runs in the audio-thread:
- should avoid variable size work
- should avoid locks
- should avoid allocation/de-allocation
- should not perform IO
Some good resources on this subject:
- Real-time audio programming 101: time waits for nothing - Ross Bencina
- Using Locks in Real-Time Audio Processing, Safely - Timur Doumler - ADC20
- The Golden Rules of Audio Programming - Pete Goodliffe
Interactive GUI
Second, we want the GUI to be highly interactive. The GUI should render visualisations of the operations taking place in the audio side whenever possible.
(Note: this is a screen recording and much louder than the previous video)
The following data needs to constantly update on the UI:
- Global play-head position
- The position of the track in beats at the center-top
- Sequencer position
- The current active step flashes in the sequencer view
- Looper play-head position
- The position of each looper within its recording, represented by the green line over the rendered audio wave and by the green fill over the track’s button
- Last MIDI messages
- This isn’t shown, but a monitor of previous events is displayed when the MIDI button on the top-right is clicked
Looper quantization
This is the main reason I wanted to write a looper.
Quantization in live-loopers refers to automatic tempo correction of the presses to the record/stop/play buttons. This is to aid musicians to record loops in sync with some tempo.
For example, there may be a drum track playing or another looped track. Whenever a new loop is recorded it should have a length that makes sense in the current tempo and time-signature (subject to configuration).
Most software loopers I’ve tried only correct the musician being early, but don’t correct them being late. I have hardware looper pedals which do both.
If there’s a tempo track playing and a musician presses to start a recording at beat 3.7, the looper will wait until the 1st beat of the next bar. This is correcting for when the musician is early.

However, if the musician is late, we’d also like to correct the tempo, by assuming that the button had already been pressed (in the past) and then continuing to operate.

These two quantization strategies are implemented and selectable on Continuous Looper and there is some more around implementation later on.
Architecture
IMPORTANT: I am not a professional audio developer
Please give me feedback! :)
Continuous Looper’s engine is built using the Rust crates I have been
building on augmented-audio.
It benefits from several crates in the rust ecosystem such as petgraph,
cpal, basedrop,
actix and more (ringbuf, etc. the list
of dependencies is very long).
The GUI is built using Swift, AppKit (and UIKit at some point) and SwiftUI.
Originally a simpler looper GUI was built using iced:

I will likely still use iced to ship a simplified VST.
Swift/AppKit/UIKit/SwiftUI are more mature and allow iOS support, so this version of the app uses them.
Containers or components
Here’s a “Container diagram” (I’m likely misusing the C4 model in my context):

- User
- Some musician that wants to use the app
- Continuous macOS/iOS App
- GUI, which users will interact with
- LooperEngine
- Audio engine, which communicates with the app through a C API
- MIDI controllers
- System Audio/MIDI APIs
Next, I will go over details, starting with high-level notes, then talking about the GUI and moving on to details of specifics of the rust implementation.
System Audio/MIDI APIs - API wrappers
For 5, the system APIs are wrapped by cpal and midir
for audio and MIDI support, respectively.
Both of these are wrapped by the higher-level AudioProcessor trait
abstraction:
These higher-level abstractions allow the looper engine (3) to work
drop-in in a hosted scenario, such as within a VST. They currently
use traits for AudioBuffer and MidiMessageLike so that buffers and messages
could be compatible with both rust and VST C API representations.
The ‘application code’ uses:
Then, the crates in crates/augmented/application
provide standalone and hosted helpers to run our processors as an online CLI,
offline file processor or VST plugin.
The gist is audio-buffers and MIDI messages are abstract and so are audio processing nodes. However, I now have the impression converting into a common type before doing audio processing could have been a better option than making all implementations support abstract types.
LooperEngine/Swift integration - Rust & Swift integration
Most of the Continuous Looper integration issues are in the bridge between Continuous macOS/iOS App 2
and LooperEngine 3.
Communication is done through a C bridge. C API bindings are generated with
cbindgen. Universal binaries are built with cargo-lipo.
The bridge is a good candidate for review, because it uses too many strategies at the same time.
Data is exchanged between Rust/Swift in 4 ways:
- Polling: GUI poll/queries for state from the audio engine
- for example: play-head state or shared read-only references to audio buffers
- Push from GUI: GUI dispatches changes to some object
- for example: a float/int/binary/enum parameter
- Dispatch from GUI: GUI dispatches a command
- for example: “start recording” when the record button is clicked
- Dispatch from engine: LooperEngine dispatches an event
- for example: MIDI/IO events happened
At the moment, most data is copied in both Swift and Rust sides. These two must sync and things would be a lot simpler if this wasn’t the case.
I believe this will start to be a bigger problem when persistence is added, which allow certain more complex structures to be changed from the Rust side. These changes will need to be pushed/queried somehow.
Additionally, there’s shared memory in the case of audio-buffers, where Swift just references the same audio-buffer used in the looper. This is fine thanks to reference counting, some safer wrappers around the C API and because the looper buffer will be pre-allocated to a maximum capacity at the start.
Polling for changes
For some data, the GUI poll the audio-thread every 1/60 seconds.
Though the data could be pushed from the rust side instead I think generally
the strategy of polling audio-thread state makes sense.
The play-head for example (our position within the song or loop measured in samples/beats/seconds) updates at least every audio callback (1-10ms). Since this may update at much higher frequency than our GUI and represents time ticking, we can poll for it at the UI refresh rate we want.

Some data can be polled at lower frequencies, such as the CPU indicator on the top-right (there’s a section about the CPU meter later).
One downside of SwiftUI in this context is that since our data will change on every frame, I imagine a lot of work performed by the library to optimise performance by avoiding invalidating a view is wasted.
Push from GUI
SwiftUI provides an ObservableObject class, which allows views to update
automatically when some properties change. This is similar to
mobx and really nice to use.
The bridging code benefits by listening to changes to these objects and pushing them into the rust engine.
Pushing observable object changes out of the GUI into Rust could look something like this:
class StartParameter: ObservableObject {
    @Published var value: Double = 0.0
}

struct StartParameterView: View {
    // this view will update whenever StartParameter::value changes
    @ObservedObject var startParameter: StartParameter
    var body: View { /**/ }
}

// Set-up a subscription to the value field and push it into rust
// on changes
func syncStart(parameter: StartParameter) -> AnyCancellable {
    return parameter.$value.sink(receiveValue: { value in
        looper_engine__set_start_parameter(value)
    })
}
However, this is not super manageable for a larger nº of parameters, so the solution used is moving towards a slightly more generic binding.
This also stops working once there’s communication in the other direction (Rust -> Swift). The users may map MIDI controllers to parameters, so at any point a MIDI event could be changing a parameter without the GUI knowing.
We want the GUI to update when a MIDI controller’s knob is mapped to a parameter, and it’s moved.
At the moment this is addressed with polling the Rust looper state from the
GUI. There’s an EntityId, which all GUI controls and parameters have and all
entities* are pushed into and polled from the rust side.
*all entities that are MIDI/LFO/Step/Scene mappable (knobs and some buttons)
SwiftUI Performance
I’ve found a number of bottlenecks related to the GUI and this set-up (but I think it is just generally really hard to build this sort of GUI and be performant whatever the technology).
The iced GUI, though simpler and ‘inefficient’ (iced must re-layout and draw
everything if anything wants to update), consumed a lot less CPU. I’m afraid my
app might be too CPU intensive for some lower-end computers or iPads - this might
go into another post.
In particular:
- Setting a
@Publishedproperty will trigger updates even if the value doesn’t change, this is a massive CPU sink, so we can’t do it- Instead, we read the property before setting it
- Reading the
@Publishedproperty in anObservableObjectis super expensive compared to reading a normal property - Updating SwiftUI views at a high rate is a major performance bottleneck, so the views that will update frequently (step sequencer buttons and knobs) use AppKit instead of SwiftUI
I have profiled my SwiftUI issues and found some accessibility code + forced layout are the culprit. Setting a fixed size for the window improved things partially, but using AppKit was the better escape hatch.
There is still a lot of room to improve the GUI performance.
Callbacks from rust to swift
Regarding how to call into Swift from Rust, Nick Wilcox has written great documentation on how to achieve this here:
That is pretty much the set-up used. You can check the source code here and here.
Swift frameworks, packages and apps
The following is a diagram of some views / components in the Swift GUI side.

Just some tiny things worth mentioning.
Store: We hold all state under a ‘store’ object which makes it a bit easier
to pass it around or mock it out.
SwiftSequencerEngine: There’s no code calling into native Rust directly in the
GUI itself. There are multiple packages in the XCode project:
- the GUI exists in a cross-platform Swift package
SequencerUI - the rust library is linked against a separate
framework
The reason for this is to be able to support multiple platforms (iOS/macOS).
Also, having a simple SequencerUI swift package that doesn’t link to anything
fancy allows normal XCode tooling such as previews or Swift specific unit-tests
to work normally and faster.
SequencerUI declares a SequencerEngine protocol/interface, which the
SequencerEngine.framework frameworks for macOS/iOS (which are exactly the same
source, but different build configurations) implement in SequencerEngineImpl.
As mentioned, most data is copied from the engine into the Store objects,
except for audio buffers which are shared.
For audio buffers, another protocol is declared in SequencerUI and the engine
implements this protocol for some C struct pointer wrappers, which are
essentially wrappers on top of reference counted AudioBuffer rust objects.
SequencerUI and SequencerEngine.framework are then consumed by the
application projects themselves for iOS/macOS.
I have not released the iOS app, because there are currently issues with certain IO channel configurations; but the app runs (with Rust!) fine on iOS, and it is going to be great.
Rust components
All the audio processing code I’m writing is following a “shared handle” pattern:

- Every audio processor is a struct with a “process buffer” method
- This method takes a mutable reference to the processor
- The audio-thread owns the processor
- Any state that must be changed from other threads is done via a handle
- A handle is a reference counted shared thread-safe struct (using atomics) that both the processor and GUI can read/write from
In code, this looks like this:
let processor = MultiTrackLooper::default();
let processor_handle: Shared<MultiTrackLooperHandle> =
        processor.handle().clone();

// send the processor to the audio-thread
let _audio_handles = audio_processor_start_with_midi(
    processor,
    audio_garbage_collector::handle(),
);

// the handle can change things and dispatch events
processor_handle
    .set_source_parameter(LooperId(0), SourceParameter::Speed, 2.0);
// open the GUI with the handle now
This introduces indirection to access anything on the handle (which is all processor state a lot of the time). I haven’t measured the performance impact in a larger example such as the looper.

That’s how the looper is structured: there is a LooperEngine struct created
by the Swift GUI that starts a couple of different background workers,
among which is the audio_processor_standalone instance.
audio_processor_standalone is the audio/MIDI threads.
The audio/MIDI threads own the processor and reference shared state the GUI can read and update (through special APIs).
MIDI events might arrive in a different thread and are pushed via a lock-free queue to the audio-thread. I think we could handle MIDI events out of the audio-thread, but that’s how things are done right now.
MultiTrackLooper and MultiTrackLooperHandle are where all the magic happens,
which leads us to…
Rust and audio
Multi-track looper audio graph
MultiTrackLooper processing has the following topology:

Each track has, in series, a single-track looper, pitch-shifter, ADSR envelope,
effects (which are not in the published version of the app, as they have some
issues) and gain. This graph of processors is built using audio-processor-graph
which is a partial audio graph implementation in the repository.
The looper is by far the largest processor in this chain, since a lot of the other nodes are very simple. Currently, the “effects” node is a sub-graph.
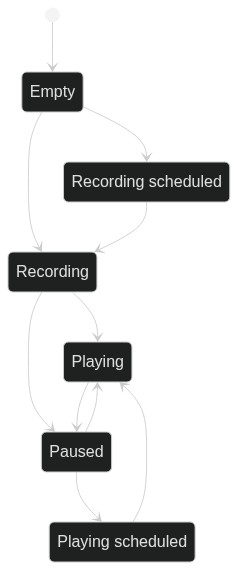
Looper states
The looper can be in different states:
- Empty
- Recording
- Playing
- Paused
Three additional states are used to represent overdubbing and the cases where playing/recording are scheduled.
Each of these needs special treatment of both the actions (what transition to trigger on interaction) and more importantly on how they render/handle the audio callback.
Always recording buffer
We want to support “snap closest” behaviour:
And, in fact, we also want to support this when starting to record/play.
In this case, the looper will receive a start recording command after it was supposed to have started.

For this, we need to have an always recording buffer (the ScratchPad). The
scratch-pad will be a circular buffer for the last few seconds which will always
be recording.
Then, when recording is triggered, we can either:
- store what our “write cursor” position within the scratch-pad is
- or copy the last few seconds into another buffer
Currently, Continuous Looper has a pretty small 10s limit on loop length, so it uses the scratch-pad to record and copies to another buffer only when the recording is ended.
Quantization implementation
Keeping track of time: Play-head
I didn’t know of Vlad Voina’s “Loopers and bloopers” talk when I implemented this, but gives some ideas of things I could be fixing next.
In order to quantize we first need to be able to keep track of the play-head position, as represented in previous tempo diagrams.
The play-head is our position within the song. This should be a value we can convert into/from samples, beats and seconds and that represents the timestamp within the song of the play-head (the playback).
In augmented-audio, I’ve implemented a basic hosted PlayHead data structure
in augmented_playhead.
The gist is that we keep track of the current sample and then calculate our
position in seconds/beats based on the tempo and sample-rate:
let elapsed_samples = get_elapsed_samples_from_somewhere_pass_it_in();
let elapsed_secs = (1.0 / sample_rate) * (num_samples as f64);
let beats_per_second = tempo_in_bpm as f64 / 60.0;

let elapsed_beats = beats_per_second * elapsed_secs;
All units can be converted to one another. One important thing to do is to use
double precision, because there will be serious inaccuracies if f32 is used
after a certain song length.
Vlad Voina’s talk linked above mentions the size of the elapsed_samples cursor,
as just incrementing it will eventually overflow. Generally it’s not an issue
for this use-case.
In order to tempo-sync with a VST host, the Continuous Looper engine is using a
TimeInfoProvider abstraction, which wraps both a ‘stand-alone’ play-head and a
‘hosted’ implementation. The source code is here.
The idea is we will tick and control the tempo when running in an app, but when running inside a VST we will call back into the host via the VST API to get the current play-head. I will extract this out of the looper application for re-use later.
Implementing quantization
Once we know the play-head position, quantization is some calculations, which depend on the time-signature, our position in beats and (for snap closest) a mistake correction threshold.
// This code is subject to the MIT LICENSE terms in https://github.com/yamadapc/augmented-audio/blob/master/crates/apps/looper/looper-processor/src/audio/loop_quantization.rs#L89-L114

// This returns a positive nº to the next 1 beat
fn snap_next_beat(quantization_beats: usize, position_beats: f32) -> f32 {
    let f_beats = quantization_beats as f32;
    (position_beats / f_beats).ceil() * f_beats
}

// This returns either a positive or negative nº to the closest 1 beat
fn snap_closest_beat(
    quantization_beats: usize,
    tempo: f32,
    threshold_ms: f32,
    position_beats: f32,
) -> f32 {
    let beats_per_ms = tempo / 60_000.0;
    let threshold_beats = beats_per_ms * threshold_ms;

    let f_beats = quantization_beats as f32;
    let ratio = position_beats / f_beats;
    let lower = ratio.floor() * f_beats;
    let upper = ratio.ceil() * f_beats;

    #[allow(clippy::float_equality_without_abs)]
    if ((lower - position_beats).abs() - threshold_beats) < f32::EPSILON {
        lower
    } else {
        upper
    }
}
Since we have our scratch-pad, the looper can handle negative quantization offsets. I imagine similar quantization logic would work for other applications.
Testing audio
In order to test audio processors I am trying a couple of approaches.
Again, I’m not an audio developer (and there’s a lot to fix in the repo!), but maybe it can be useful.
Normal unit-testing with mock buffers
For looper logic which just records and reproduces samples, we can unit-test
using small made-up (1,2,3) buffers and check that the output makes sense after
certain operations.
This is regular unit-testing as on any domain.
Property based testing
On some small pieces, I’ve experimented with tests such as “feed a sine-wave into this DSP code and check that the output has the same RMS as the input”.
I imagine with more analysis properties this would be more meaningful.
I have drafted some analysis code on audio-processor-analysis,
but there isn’t a lot of usage in tests, and I’d need to experiment more.
Visualization
This isn’t a proper test, but very often, it’s helpful to visualise what the
signal is doing, so I used plotters and sometimes piet to generate charts.
The analysis crate above is a good example of doing this, but there are several in the repository.
audio-processor-testing-helpers exposes a function to make it dead simple to
plot a vector of floats and have a look at the signal:
// this macro returns a relative path to the CARGO_MANIFEST_DIR
let pth = relative_path!("src/lib.rs");
// will create `src/lib.rs--chart_name.png
draw_vec_chart(pth, "chart_name", my_vector);
Snapshot testing
Since we get free CLIs from our abstraction code, the repository has a couple of snapshot tests which run in CI and are documented in SNAPSHOT_TESTING.md.
This is just rendering some audio through each effect and checking hashes match what had been committed.
Maybe comparing properties or visualisations here would be more meaningful and less brittle.
However, this approach and the others increase my level of confidence I’m not breaking things when making changes.
Testing allocations
All audio-thread code is trying to avoid (de)allocations, which increases complexity quite a lot. This is very hard to avoid in the Rust ecosystem with many 3rd party libraries that provide lock-free or immutable data-structures allocating on reads.
In order to unit-test that allocations aren’t being made the assert_no_alloc crate
is of great help. It replaces the global allocator so that sections of the source
can disable allocations (causing the program to print a warning or crash).
On unit-tests this can be used to test sections are allocation free.
Sequencer implementation
My sequencer implementation is based on detecting when the play-head has changed from one beat to another. A “step-tracker” struct keeps track of the last position in beats. When a new position is received, it checks if there was a trigger.
let prev_position = 0.9; // <- prev beat is 0
let curr_position = 1.1; // <- curr beat is 1
// trigger beat 1.0
The active steps, along with parameter lock information are kept on a shared vector pointer.
When the GUI wants to add a step, it’ll copy the vector, make changes and then
atomically swap the old pointer with the new. This is done using
basedrop::SharedCell.
When both threads are done with the old data it’ll be released on a background thread.
I wanted to use immutable data-structures for this case, but there should be negligible gain at this point because the sequence can only be 16 steps.
Parameter storage - LFOs, parameter locks, sequencing
Parameters, LFO mapping and parameter locks work in a similar way.
There’s a “ParametersMap” struct, which is an array of all parameters and their values, combined with a HashMap that locates a typed (enum) parameter ID into its position.
These positions and array are pre-calculated because we know all possible parameters ahead of time. This likely won’t work moving forward.
For each step and scene there’s a similar map. The steps only hold parameters that have been locked.
On each audio callback we apply the parameter locks, scenes and so on.
We have a scratch buffer of parameters, onto which we load ‘user parameters’ the user has set through the GUI. Next, we override these with the scenes (performing linear interpolation according to the slider position). Third, we apply parameter locks if there’s an active step with them. Forth, we apply LFO modulation.
Finally, all parameters are “flushed” from the scratch parameters buffer to their corresponding handles (currently this is just the looper handle). Once there are effects and more mappable processors they would be flushed to each of these.
This scratch stage is necessary because scenes, locks and modulation introduce a mismatch between what the user has set on the GUI (the ‘user value’) and what the value should be at this current point in time.
I think this has room for improvement because:
- The current approach uses a
HashMapfor a pre-determined set of items- We could be using just an index and a Vec
- We have to manually flush parameters from this storage into the handles,
which centralises a lot of mapping code in the main
MultiTrackLooperprocessor
Conclusion
Thank you for reading my post!
I really hope you got something out of it.
I will continue to develop Continuous Looper and libraries in augmented-audio with
goal #1 being to learn and have fun. (augmented-audio/crates/apps/looper/Sequencer)
If you have feedback, please reach out, and I will be super happy to chat.
All the best, @yamadapc.